Backup & Restore with ShowOne
Our Backup/Restore feature has been rebuilt from the ground up as of ShowOne version 1.3.18 and is much improved from the first version of this feature. You may backup the contents of ShowOne to a location on iCloud Drive or your direct device storage via Files app integration, and you may share backups to other iOS devices via Airdrop.
NOTE: iOS 11 or greater is required to use the new version of the feature, known as ShowOne Backup/Restore within the app; devices on iOS 9 or 10 will have to continue to use the legacy version of the feature (more info on that below).
——————
When performing a backup, ShowOne will create an “archive.showone” file within Files on your device which is essentially a container with all of your ShowOne data. This “folder” can be handled much like any within iOS – you can rename it, duplicate it, share it to others, etc.
Backing up will preserve:
- all tracks within ShowOne including the associated audio files
- all track settings (pitch, track trim, etc)
- all sets and set settings
- a backup will NOT preserve global settings such as click sound, output mode, etc
Restoring will bring all of these settings back into ShowOne on any device so long as the device has ShowOne installed and the Backup/Restore feature enabled.
IMPORTANT: Restoring a backup will erase all current contents of ShowOne before the restore takes place, so use caution when restoring.
Using ShowOne Backup/Restore
To share a ShowOne backup directly to another device via Airdrop:
TIP: Set both devices’ Airdrop settings to “Everyone for 10 minutes” to insure the devices can see each other correctly
1. On the primary (sending) device, go to ShowOne Settings > Backup/Restore and choose ShowOne Backup/Share.
2. Wait for backup to finish it’s startup process, then choose “Airdrop” from the chooser.
3. Select the other Airdrop-capable device nearby and wait for the backup to be delivered (this may take a while with very large backups – if it fails simply keep trying until it works, or see below).
4. Once the Airdrop share has completed, the 2nd device (receiving) may show an “Airdrop Complete” notification – press this. This will take you to the recently received “archive” file within the Files app > Recent Items- press this. This will open ShowOne to complete the Restore function. On some iOS versions this may all happen automatically once the Airdrop is complete.
TIP: If you miss the “Airdrop Complete” notification on the 2nd device, simply head to your Files app > Recent Items and choose the archive that was just sent – this will open ShowOne to complete the Restore.
5. Once complete, verify that the 2nd device has all the tracks and sets that were on the 1st device.
Be aware that a “Restore” will fully replace the ShowOne contents of the receiving device with that of the sending device.
NOTE: Airdrop can be finicky, especially with very large files. If your Airdrop is stuck on “waiting”, or you get an “Airdrop” failed alert, restart both devices and try again. You may just have to try a few times if you have a very large library. If it continues not to work, backup and restore using a cloud service as described below.
To save a ShowOne backup to iCloud Drive or your device storage:
1. Go to ShowOne Settings > Backup/Restore and choose ShowOne Backup/Share
2. Wait for backup to finish it’s startup process, then choose “Save To Files” from the chooser.
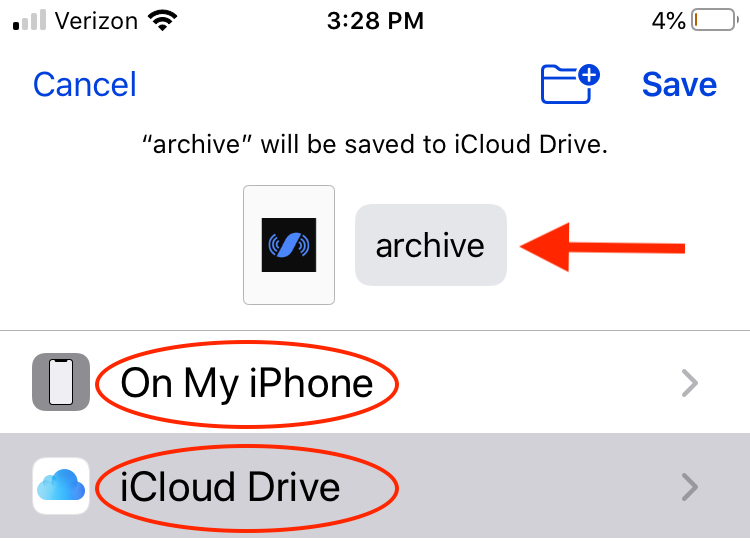
3. Pick a location on iCloud Drive or On My iPhone/iPad and choose “Save”. You may also rename the file by pressing it’s name near the top of the screen (iOS 13+ only; you can rename archives within the Files app on iOS 11 & 12).
4. Wait for ShowOne to finish backing up and then you’re done. You can verify that the backup completed by going into the Files app and navigating to where you chose to place the backup – you should see it there.
5. You may now move, rename, duplicate, delete, or share this or any ShowOne backup files within the Files app. Simply press and hold the file and a list of actions will come up.
IMPORTANT: Back up only using the Save to Files or Airdrop commands – other inter-app share commands won’t work. Also – only choose “iCloud Drive” or “On My iPhone/iPad” when selecting a location or directory in which to store a backup after the “Save to Files” command. Any other locations such as Dropbox or Google Drive won’t work reliably.
TIP: Dropbox, Google Drive, or other cloud service user? While you can’t directly backup and restore between ShowOne and those services, you can compress (“zip”) your .showone files within the Files app by holding down the file name and choosing “Compress” from the drop-down menu and moving them to any of the other cloud services or external hard drives for archiving. Leave the most recent backup accessible on iCloud Drive or “On My iPhone/iPad”, and keep archives of your others on your storage solution of choice. If you need to restore from one of those archives, simply move it back to one of valid locations using the Files app and restore. Make sure to “unzip” it first.
To restore a ShowOne backup from iCloud Drive or your device storage:
1. Go to ShowOne Settings > Backup/Restore and choose ShowOne Restore*.
2. Navigate to an area within the Files browser where you save your ShowOne archives. Select one. (Remember, this will only work when the archive is either in iCloud Drive or “On My Phone/iPad”).
3. Wait for the restore to complete and verify that all of your tracks and sets are where they should be within ShowOne.
* You may also go the Files app and simply select/press a ShowOne archive within an iCloud Drive or “On My iPhone/iPad” directory – this will automatically open ShowOne and begin a restore of that archive.
TIP: We recommend leaving at least 1GB free on your iCloud drive to use this feature, especially if you work with larger format files such as WAV or AIFF for your tracks. If you expect to accumulate lots of archive files and don’t have a lot of room on your iCloud Drive, you can compress (“zip”) them and store them elsewhere until you need them again. Just remember that the only way to restore a backup to ShowOne properly is from iCloud Drive/On My iPhone or via an Airdrop transfer.
TIP: Some very large backups (with many WAV files for instance) may take a long time for uploading and restoring. Be patient.
Using the legacy Backup/Restore feature (iOS 10 and previous)
If you are on a device that can’t update it’s iOS to iOS 11 or greater, you’ll need to use the legacy backup/restore feature. While useful, it has several notable limitations when compared to the new feature:
- you are only allowed one backup at a time
- the backup cannot be seen or modified, and must reside invisibly on your iCloud Drive
- the backup can’t be shared or transferred to other locations
- large backups will likely fail
Because of this we highly recommend moving to newer devices that can take advantage of the new backup/restore feature and Files app integration of iOS 11 and higher.
To perform a legacy ShowOne backup/restore:
1. Go to ShowOne Settings > Backup/Restore and choose Device Backup (legacy)
2. See the size of the backup, and choose OK.
3. When the backup completes, choose OK.
4. To restore to any device, make sure the device is signed in to the same Apple ID that was used to perform the backup, and choose Device Restore (legacy)
5. See the size of latest backup, and choose OK.
6. Wait for restore to complete and verify that it worked correctly by checking your tracks and sets.
TIP: You can still use this feature across devices on iOS versions 9 and up. For instance if you have an iPhone X on iOS 13 and an older iPad on iOS 9 or 10, you can perform a legacy backup on the iPhone and a legacy restore on the iPad to match the contents of both.